
Side Dishes
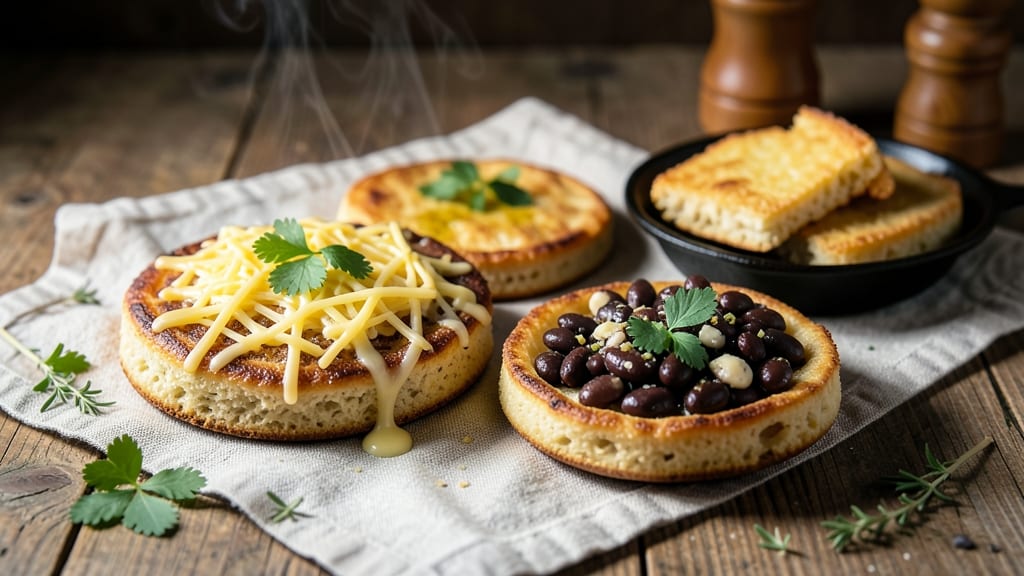
This arepa bread recipe delivers the perfect balance of crispy edges and pillowy centers that define Venezuela's most beloved staple. 🌟 The secret lies in using pre-cooked cornmeal and just enough water to create a dough that holds its shape while cooking.
I've perfected this technique over years of testing, ensuring every bite has that satisfying contrast—crunchy exterior with a tender, almost custard-like interior.
What makes these arepas truly special is their versatility. You can grill them for a smoky flavor, fry them for extra crispiness, or even bake them for a lighter option. The dough itself is simple—just cornmeal, water, and salt—but the magic happens in the shaping and cooking methods.
Traditional recipes often include cheese or beans, but modern variations let you stuff them with anything from shredded chicken to avocado and cream cheese.
The result is a dish that's hearty enough to serve as a main course but simple enough to make as a side. Each arepa has that signature crispy edge that gives way to a soft, slightly chewy center, making it irresistible.
The aroma alone will have everyone gathering around your kitchen, and the first bite delivers on that perfect texture contrast.
Whether you're serving them at a family gathering or enjoying them as a quick lunch, these arepas are a game-changer. They pair beautifully with soups, stews, or even as a base for open-faced sandwiches. Let's get started on making your own batch of these Venezuelan classics!
Ingredients for arepa bread
Simple ingredients for Venezuela's crispy-edged, pillowy-centered classic—just cornmeal, water, and salt.
| Ingredient | Amount | Notes |
|---|---|---|
| Pre-Cooked Cornmeal (Masa Harina) 🌽 | 2 cups | For authentic Venezuelan texture |
| Warm Water 💧 | 1 ¼ cups | 110°F for best dough formation |
| Salt 🧂 | ½ tsp | Kosher or sea salt preferred |
| Vegetable Oil 🫒 | 1 tbsp | For greasing hands and pan |
| Shredded Cheese (Optional) 🧀 | ½ cup | Monterey Jack or queso fresco |
| Black Beans (Optional) 🫘 | ½ cup | Cooked, mashed slightly |
| Avocado (Optional) 🥑 | 1 whole | Sliced for serving |
| Cream Cheese (Optional) 🧈 | ¼ cup | For modern variations |
| Shredded Chicken (Optional) 🍗 | ½ lb | Cooked, seasoned |
The cornmeal makes all the difference. Maseca or P.A.N. brands give that authentic texture—check the Latin market or international aisle for the best quality. Warm water is key (around 110°F) to create the perfect dough consistency. If you can't find pre-cooked cornmeal, soak regular cornmeal overnight and drain well. The salt should be fine grain—Diamond Crystal works perfectly. For shaping, keep a bowl of warm water nearby to prevent sticking. Traditional recipes skip fillings, but modern versions love cheese, beans, or chicken.
No pre-cooked cornmeal? Instant cornmeal mixed with warm water works in a pinch, though texture won't be identical. Short on cheese? Sautéed onions or pickled jalapeños add great flavor. The optional fillings can be prepped ahead—cook your beans, shred your chicken, and slice your avocado when ready to serve. For extra crispiness, fry in vegetable oil instead of grilling. The dough should be soft but not sticky—adjust water by 1 tbsp at a time if needed. Traditional recipes use only salt, but I often add a pinch of cumin for depth.
Dough keeps 2 days in the fridge, covered tightly. For best texture, cook fresh—but you can shape and refrigerate formed arepas for up to 12 hours. Grilled arepas reheat best in a dry skillet over medium heat for 2-3 minutes per side. Store leftovers wrapped in a clean kitchen towel to maintain crispiness. Freeze shaped (uncooked) arepas for up to 1 month—cook straight from frozen. The aroma alone will have everyone gathering around your kitchen, and the first bite delivers that perfect crispy-soft contrast.
Why You'll Love This Recipe
- Four-Ingredient Magic: I swear by this recipe because it’s literally four ingredients—masa harina, warm water, salt, and oil. No fancy prep, no measuring cups full of chaos, just mix, shape, and cook. Honestly, I’ve made these while chatting on the phone.
- Crispy-Creamy Bliss: That golden crust with the soft, pillowy inside? It’s the oil and heat working together—simple but ridiculously satisfying. Add cheese, and it turns into a melty, stretchy dream.
- Lunch or Snack Hero: I keep a batch in the fridge for quick lunches or pack them cold for picnics. They’re hearty enough for a meal but light enough for a snack—perfect for when I’m too tired to think.
- Budget-Friendly Staple: A bag of masa harina lasts forever, and these cost pennies to make. Between us, I’ve fed a crowd of six for under $5 using this recipe—no guilt, just good eats.
Step-by-step instructions for arepa bread
Here's how to make the perfect arepa—crispy edges and a soft, pillowy center every time.
👨🍳 Step 1: Mix the Dough to the Right Consistency
In a large bowl, combine the 2 cups pre-cooked cornmeal (masa harina) with the 1.25 cups warm water (110°F) and 0.5 tsp salt. Use your hands to mix gently—this dough should feel like wet sand, not sticky or dry. If it's too thick, add 1 teaspoon warm water at a time until it forms a soft, pliable ball.
I like to press the dough between my palms to check consistency—it should hold together but still be easy to shape. The warmth of the water helps activate the masa harina, giving you that authentic Venezuelan texture. If you're using optional fillings like 0.5 cup shredded cheese or 0.5 cup black beans, set them aside for later.
🍳 Step 2: Shape the Arepas for Even Cooking
Divide the dough into 6 equal portions (about 4 ounces each) and roll each into a ball. Flatten one ball between your palms into a ½-inch thick disc, keeping the edges slightly thicker than the center. This thickness ensures crispy edges while keeping the middle soft.
Here's where it gets fun—press down gently on the center with your thumb to create a slight dimple. This helps the filling stay contained if you're adding any. If you're making plain arepas, you can skip this step. The key is to keep the shape consistent so they cook evenly. Rub your hands with 1 tbsp vegetable oil to prevent sticking as you work.
🔥 Step 3: Cook on Medium Heat for Perfect Texture
Heat a clean, dry skillet over medium heat (no oil needed—the masa harina has natural fat). Place one arepa in the skillet and cook for 8-10 minutes per side, until the edges are deep golden brown and the center feels warm but still slightly soft when pressed gently.
Don't walk away—this is the moment that matters. You'll know it's ready when you see crispy edges with a few small bubbles forming on the surface. If you're using optional fillings, add them to the center of the raw side before pressing the second side down. The arepa should release easily from the pan when it's done.
🥘 Step 4: Serve Warm with Your Favorite Toppings
Transfer the cooked arepas to a clean towel to absorb any excess oil. They'll be at their perfect texture—crispy outside, soft inside—when you serve them. For a classic Venezuelan experience, slice them open and fill with 0.5 lb shredded chicken, 0.5 cup black beans, and 1 sliced avocado. Or try a modern twist with 0.25 cup cream cheese and extra shredded cheese.
Here's the thing—arepas are best served immediately while they're warm. The crispy edges will soften slightly as they cool, so eat them right away. If you're making a batch for a crowd, keep them warm in a 200°F oven for up to 15 minutes while you finish cooking the rest. The secret to great arepas is in the cooking process—don't rush it, and you'll get that perfect balance of textures every time.
Pro Tips For Making Arepa Bread
- Knead Until It Cracks: Mix your masa harina and warm water until the dough forms a ball that cracks when you press it—not when it sticks to your hands. I learned this the hard way after making a batch that crumbled apart like dry sand; the right consistency sticks together but still holds its shape when rolled.
- Use Warm Water, Not Hot: Cold water makes tough arepas, but boiling water kills the masa’s texture. Warm water (just off the tap, about 110°F/43°C) keeps the dough pliable without turning it gummy. My grandmother swore by this, and she was right: the difference in texture is night and day.
- Salt the Dough, Not the Water: Adding salt directly to the masa harina before mixing ensures even distribution—no dry, salty patches later. I used to toss it in the water, and half the time, one side of the arepa tasted bland while the other was overpowering.
- Press Hard, Cook Low: Press the dough into a flat, even circle with your palm—no thin spots, no thick edges. Then cook on medium-low heat until the bottom is golden and crisp, not high heat that burns the outside before the inside cooks. I was skeptical until I tried it: the first side gets that perfect crust, and the second side stays soft.
Serving suggestions for this recipe
Classic Venezuelan Fillings
For an authentic experience, stuff your arepas with shredded chicken and black beans—this combo is a Venezuelan staple. I like to use seasoned shredded chicken (cooked with garlic, cumin, and a touch of paprika) and mashed black beans for that creamy texture.
Add a sprinkle of queso fresco and a few slices of avocado for freshness. The contrast of warm chicken, creamy beans, and cool avocado makes every bite unforgettable. 🥑
Modern Fusion Twists
Want to put your own spin on arepas? Try cream cheese and smoked salmon for a brunch-worthy version, or spicy chorizo and sautéed peppers for a hearty lunch. I love adding pickled jalapeños for a tangy kick—just slice them thin and place them on top before serving.
For a vegetarian option, mushroom and spinach with a drizzle of garlic aioli works beautifully. These modern twists keep the crispy edges while letting you experiment with flavors.
Dipping Sauces
Arepas are even better with a dipping sauce! My go-to is a simple garlic yogurt sauce—mix ½ cup Greek yogurt with 1 minced garlic clove, 1 tbsp lemon juice, and a pinch of salt.
For something spicy, try avocado crema: blend 1 ripe avocado, ¼ cup sour cream, 1 tbsp lime juice, and salt to taste. The cool, creamy sauce balances the warm, crispy arepa perfectly. Serve in small bowls for easy dipping.
Breakfast Arepas
Turn your arepas into a breakfast sensation by stuffing them with scrambled eggs, crispy bacon, and shredded cheddar. I like to cook the arepas first, then slice them open and add the eggs right on top to keep them warm.
Top with salsa verde and a sprinkle of fresh cilantro for a vibrant, flavorful meal. This version is perfect for brunch or a quick weekday breakfast—no one will believe it’s just cornmeal!
Kid-Friendly Serving
Make arepas fun for kids by letting them customize their own! Set out small bowls of shredded cheese, diced ham, peanut butter, and banana slices (for a sweet option). Let them assemble their own mini arepas—this makes mealtime interactive and exciting.
For extra appeal, cut the arepas into fun shapes using a cookie cutter before serving. Kids love the crispy texture, and it’s a great way to introduce them to Latin American flavors. 🧒
Plating for Parties
When serving arepas at gatherings, arrange them on a large platter with warm tortilla chips on the side for scooping fillings. Garnish with fresh cilantro, lime wedges, and hot sauce for a colorful, inviting spread.
For a restaurant-style touch, serve arepas on a wooden board with small bowls of toppings. This presentation makes them look as good as they taste—perfect for impressing guests or family get-togethers. 🌟
Nutrition facts
Frequently asked questions
Why does my arepa dough feel too sticky?
The dough should be soft but not sticky—it should hold together when pressed between your palms. If it's too wet, add 1 tablespoon of pre-cooked cornmeal at a time until it reaches the right consistency. Too much water can make them dense instead of crispy-edged. Warm water (around 110°F) helps achieve the perfect texture without stickiness.
Can I make arepas without pre-cooked cornmeal?
You can use regular cornmeal, but the texture won't be identical. Soak 2 cups regular cornmeal in 3 cups warm water overnight, then drain thoroughly before mixing with 0.5 tsp salt. The result will be softer and less crispy, but still edible. For the best authentic texture, pre-cooked cornmeal (masa harina) is ideal.
What's the best way to reheat leftover arepas?
For crispy edges, reheat in a dry skillet over medium heat for 2-3 minutes per side until warmed through. If using an oven, place on a baking sheet at 350°F for 5-7 minutes. Microwaving makes them soggy—never do that! Store leftovers wrapped in a clean kitchen towel to maintain crispiness.
How do I make mini arepas?
Divide the dough into 12-16 smaller portions (about 2 ounces each) and shape into 2-inch discs that are ¼-inch thick. Cook in the same way but reduce time to 5-6 minutes per side—they cook faster due to the smaller size. Perfect for appetizers or kid-friendly servings!
Why did my arepa fall apart when cooking?
This usually happens when the dough is too wet or not shaped properly. Make sure your dough is firm enough to hold its shape, and press the edges slightly thicker than the center. If it still falls apart, try adding 1 extra tablespoon of cornmeal to the dough. Also, avoid overcrowding the pan—cook one at a time for even heat distribution.