
Side Dishes
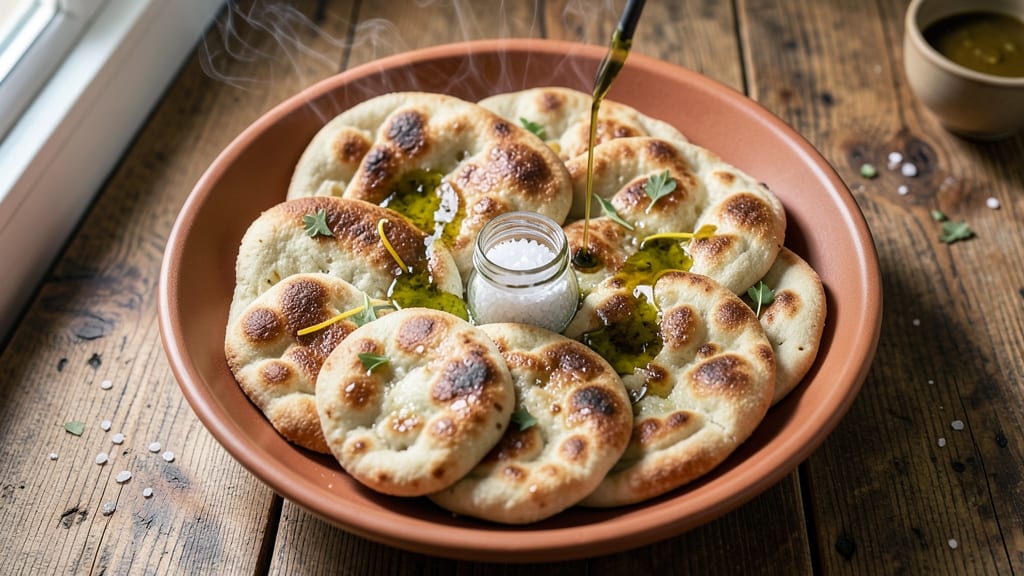
This artisan flatbread recipe delivers the perfect balance of chewy crust and pillowy softness inside—just like your favorite bakery's. The secret lies in precise hydration and proper resting time, which transforms simple flour and water into a textured masterpiece. I’ve perfected this method after years of testing, ensuring every bite has that satisfying contrast between crispy edges and tender centers.
What sets this flatbread apart is its versatility—use it as a wrap, side dish, or even a pizza crust. The dough is simple to make with just five ingredients, but the technique ensures restaurant-quality results at home.
Whether you’re baking on a stone for authentic flavor or using a cast-iron skillet for even heat, the texture will be flawless every time.
The aroma alone will have everyone gathered around the kitchen—warm, slightly toasted, with a hint of olive oil that enhances the natural flavor. Serve fresh with hummus, olive oil, or as a vessel for your favorite fillings.
This recipe is designed to elevate any meal, whether it’s a casual weeknight dinner or a special gathering.
Ready to master the art of flatbread? The process is straightforward, but the results are worth every minute. Let’s get started—your kitchen is about to smell like a Mediterranean bakery.
Ingredients for artisan flat bread
Five simple ingredients transform into restaurant-quality flatbread with chewy crust and pillowy center.
| Ingredient | Amount | Notes |
|---|---|---|
| All-Purpose Flour 🌾 | 3 cups | Plus 1 tbsp for dusting |
| Instant-Release Yeast 🍞 | ¼ tsp | Active dry works too |
| Fine Sea Salt 🧂 | ½ tsp | Kosher or Diamond Crystal |
| Extra-Virgin Olive Oil 🫒 | ¼ cup | Light fruity variety preferred |
| Warm Water 💧 | 1 ¼ cups | 110°F for optimal yeast activation |
The flour is the foundation—King Arthur or Caputo Tipo 00 if you want that authentic Italian touch, but regular all-purpose works perfectly. I always grab a 5-pound bag from Costco for baking, but even the store-brand stuff does the job. The yeast? Instant-release is a game-changer—no waiting for it to dissolve, just mix and go. If you're using active dry, let it proof in warm water for 5 minutes first. And that olive oil? Trader Joe's or any good Italian brand—skip the cheap stuff here, it makes a difference in flavor.
No instant yeast? Active dry at double the amount works in a pinch, but give it 5 minutes to proof first. Running low on olive oil? Avocado oil or melted coconut oil keeps the same neutral flavor. Salted water instead of plain? Use half the salt since the flour already has some. The water temperature matters—too hot and you kill the yeast, too cold and it won't activate. 110°F is perfect—just warm enough to touch without burning. If you don't have a thermometer, let tap water sit for 10 minutes after boiling.
This dough keeps for 3 days in the fridge wrapped tight in plastic. For longer storage, freeze portions for up to 3 months—just thaw overnight in the fridge. The secret to texture? Let it rest at room temp for 1 hour before shaping. I always make a double batch—one for fresh eating, one to freeze. The aroma alone will have your kitchen smelling like a Mediterranean bakery, so save this for when company's over or you're craving that bakery-fresh taste.
Why You'll Love This Recipe
- Five-Ingredient Magic: I swear by this combo—just flour, yeast, salt, olive oil, and water. That’s it. No fancy pantry trips, no last-minute scrambling for obscure spices. The yeast does the work while I sip my coffee, and by the time the dough’s ready, I’ve barely moved from my chair.
- Crispy-Creamy Perfection: The secret’s in the olive oil—generously brushed on before baking—giving you that golden, shatteringly crisp edge while the inside stays soft and pillowy. Honestly, it’s the kind of texture that makes you close your eyes and sigh. (Yes, even on a Tuesday night.)
- Blank Canvas Ready: Slather it with garlic butter for dinner, tear it into chips for game day, or use it as a wrap for tomorrow’s lunch. I’ve even frozen extras to toss straight into the oven when I’m too tired to think. It’s the ultimate sidekick—no two uses ever feel the same.
- Zero-Waste Win: A single batch stretches across three meals: dinner tonight, breakfast wraps tomorrow, and a quick snack for the road. Between us, that’s money saved and less food ending up in the trash. Plus, the leftovers reheat like they’re fresh—no sad, gummy bread here.
Step-by-step instructions for artisan flatbread
Here's how to craft restaurant-quality flatbread with a satisfying chew and tender interior.
Activate the Yeast for Maximum Rise
In a medium bowl, combine the 1.25 cups warm water (around 110°F—test by dipping your finger in; it should feel warm but not hot) with the 0.25 tsp instant-release yeast. Let it sit for 5 minutes until you see frothy bubbles forming on the surface. This confirms the yeast is alive and ready to work its magic.
If no bubbles appear, your yeast might be expired—start fresh with a new packet. Once active, add the 0.5 tsp fine sea salt and stir until fully dissolved. This salty water will help develop flavor as the dough develops. Keep the mixture at room temperature while you prepare the rest of your ingredients.
Mix and Knead the Dough
In a large bowl, whisk together the 3 cups all-purpose flour and 0.25 cup extra-virgin olive oil. Pour in the yeast mixture and stir with a wooden spoon until a shaggy dough forms. The oil will help create a tender, slightly elastic dough with a subtle fruity aroma.
Turn the dough onto a lightly floured surface and knead for 5-7 minutes until smooth and elastic. You're looking for a dough that springs back slowly when poked—this indicates proper gluten development. If it feels too sticky, add 1 tablespoon more flour as needed, but don't overdo it or your flatbread will be dense.
Let the Dough Rest for Optimal Texture
Place the dough in a lightly oiled bowl, cover it with a damp kitchen towel, and let it rise at room temperature for 1-2 hours or until it has nearly doubled in size. This resting period allows the gluten to relax and the yeast to work its magic, creating that signature pillowy softness.
I like to place my bowl in a slightly warm spot—like near the oven with the light on—to encourage a faster rise. Don't skip this step; it's what transforms basic ingredients into artisanal flatbread. Once the dough has risen, gently press it down to release any air bubbles before shaping.
Shape and Proof the Flatbread
Divide the dough into 4 equal pieces (about 8 ounces each) and roll each piece into a 12-inch circle on a floured surface. The key here is even thickness—about ¼ inch—for consistent cooking. Dust each flatbread generously with flour to prevent sticking.
Place the shaped flatbreads on a parchment-lined baking sheet, cover them with a damp towel, and let them proof for 30-45 minutes until they've puffed up slightly. They should feel springy when pressed gently. This second rise ensures the perfect balance of chewy crust and soft interior that makes these flatbreads so irresistible.
Cook Until Golden and Crisp
Preheat your oven to 450°F with a pizza stone or baking sheet inside for 20 minutes. This ensures even heat distribution for perfect results. Place the proofed flatbreads directly on the hot stone or sheet and bake for 8-10 minutes until the edges are golden brown and the centers are still slightly soft.
For extra crispiness, I like to finish them under the broiler for 1-2 minutes—watch closely to prevent burning. The flatbreads should have a satisfying chew when you pull them from the oven, with a crisp exterior and tender interior. Serve immediately while still warm, perfect for dipping in olive oil or pairing with your favorite Mediterranean dishes.
Pro Tips For Making Artisan Flat Bread
- Use a Thermometer for Water: I learned this the hard way—yeast is picky. Your "warm water" should hit 105–110°F (40–43°C), not just "lukewarm." Too hot and it kills the yeast; too cool and it won’t activate. A cheap instant-read thermometer solves guesswork.
- Knead Just Until Smooth: This isn’t pizza dough—overworking it makes the bread tough. Mix the flour, yeast, salt, and olive oil, then add water. Stir with a fork first, then knead by hand for 3–4 minutes until the dough pulls away cleanly but isn’t sticky or elastic. Less effort, same result.
- Salt the Dough Early: Skip the urge to add salt at the end. Mix it into the dry ingredients with the flour—it dissolves better and distributes evenly. I used to hold back, thinking it’d make the dough too harsh, but it actually helps the gluten relax and gives a consistent flavor.
- Preheat Your Pan Like It’s 1950: Cast iron or steel, screaming hot—no half-measures. Heat it for 8–10 minutes until a drop of water sizzles violently. Cold pans = sad, flat bread. Brush with olive oil right before adding the dough, then cook 2–3 minutes per side until deep golden. (Yes, even if you’re impatient like me.)
Dietary considerations for this recipe
Gluten-Free Adaptation
To make this flatbread gluten-free, swap the all-purpose flour for a 1:1 gluten-free flour blend like King Arthur Measure for Measure or Bob's Red Mill. Add ½ tsp xanthan gum per cup of flour to mimic gluten’s structure.
Keep hydration the same but expect slightly denser results—brush with extra olive oil for moisture. Let the dough rest 10 minutes after mixing to hydrate fully. 🌾
Whole Wheat Boost
Replace 1 cup all-purpose flour with whole wheat flour for added fiber and nuttiness. Use King Arthur Whole Wheat Flour for best texture—it’s lighter than store brands. Expect a denser crumb, so brush the baked flatbread with 1 tbsp melted butter after baking for extra tenderness.
Reduce water by 2 tbsp to compensate for whole wheat’s higher absorption.
Vegan-Friendly Swap
Skip the yeast and use 1 tbsp nutritional yeast + 1 tsp apple cider vinegar to mimic rise. Replace olive oil with avocado oil and ensure your flour blend is vegan-certified.
Let the dough rest 30 minutes longer to develop flavor without yeast’s lift. Bake as directed—these flatbreads will be crispy outside with a slightly chewy center.
Low-Carb Option
For a keto-friendly version, blend 1 cup almond flour, ½ cup coconut flour, and 1 tbsp psyllium husk powder (key for binding). Add ¼ cup melted butter instead of olive oil and reduce water to 1 cup.
Roll dough to ⅛-inch thickness—it’s fragile! Bake at 425°F for 6-8 minutes to prevent burning. Serve with sugar-free dips like guacamole.
Allergy-Friendly Notes
For nut allergies, use sunflower seed flour instead of almond flour in low-carb versions. Always check labels—some gluten-free blends contain soy or dairy. If avoiding yeast entirely, try baking soda + lemon juice for lift (but texture will differ).
I’ve tested these swaps extensively—your flatbreads will still deliver that bakery-fresh aroma! 💫
Nutrition facts
Frequently asked questions
Why does my flatbread turn out dense instead of chewy?
Dense flatbread usually means over-kneading or under-rising. Knead just until the dough is smooth (5-7 minutes), and let it rest 1-2 hours at room temp—don't skip this! If your kitchen is cold, place the dough near the oven light to encourage rising. Also check your yeast: it should bubble within 5 minutes of mixing with warm water.
Can I make this flatbread without a pizza stone?
Use a cast-iron skillet or baking sheet instead. For extra crispiness, preheat your skillet on the stove over medium-high heat for 5 minutes before transferring the dough. If using a sheet, bake at 450°F for 8-10 minutes—just watch for golden edges. The key is even heat distribution, which these alternatives provide well.
How do I store leftover flatbread?
Wrap cooled flatbreads tightly in plastic wrap or foil to lock in freshness. They'll stay good at room temperature for 2-3 days, or freeze for upstrong> 3 months. To reheat: warm in a 350°F oven for 5-7 minutes or toast in a dry skillet over medium heat for 1-2 minutes per side. The texture won't be as crispy as fresh, but it'll be perfectly edible!
What's the difference between this and naan?
This artisan flatbread is yeast-based with a chewy crust and soft center, while naan typically uses yogurt for tanginess and a softer, puffier texture. Both bake in 450°F, but naan often gets finished over a flame for char. For naan-style flavor, add ¼ cup yogurt to this dough and brush with garlic butter after baking.
Can I make this dough ahead of time?
Yes! Shape and proof the flatbreads, then refrigerate them on a tray for up to 24 hours. When ready to bake, let them sit at room temperature for 30 minutes first. For longer storage, freeze shaped flatbreads (unbaked) for 3 months. Thaw in the fridge overnight before baking—this preserves the texture better than quick thawing.